The ballerina bun is a timeless hairstyle, loved for its elegance and versatility. Whether you’re heading to a dance class, a wedding, or a professional event, this chic updo suits any occasion. At Top Hair Dressers, you can find expert tips to master this look. This article will guide you step-by-step to create a perfect ballerina bun that stays secure and polished all day. With the right tools and techniques, you’ll achieve a flawless style effortlessly.
The key to a stunning bun lies in preparation and execution. A sleek high ballerina bun requires clean hair, the right products, and a few tricks to keep it in place. From choosing the perfect hair tie to adding finishing touches, every step matters. Additionally, this hairstyle works for various hair types and lengths. Let’s explore how to create this iconic look.
Why Choose a Ballerina Bun?
The ballerina bun is more than a hairstyle; it’s a statement. Its clean, polished look exudes sophistication. Dancers popularized it for its practicality, keeping hair secure during performances. Today, it’s a go-to for anyone seeking a refined style. Moreover, it complements formal attire and casual outfits alike.
This updo highlights facial features, making it ideal for events where you want to shine. It’s also low-maintenance once set. However, achieving that perfect, long-lasting bun takes practice. The following sections break it down.
Essential Tools and Products for a Perfect Bun
Before you start, gather the right tools. Having everything ready saves time and ensures a smooth process. Here’s what you’ll need:
- A fine-tooth comb for smooth sections.
- Strong hair ties that match your hair color.
- Bobby pins and U-shaped pins for security.
- A hairbrush for detangling.
- Hairspray (strong hold) for lasting finish.
- Gel or pomade for a sleek look.
- A donut bun maker for volume (optional).
- A mirror to check all angles.
Choose products suited to your hair type. For example, lightweight gel works for fine hair, while thicker pomade suits coarse hair. Additionally, a shine serum can add a polished touch.
Step-by-Step Guide to Creating a Sleek High Ballerina Bun
Follow these steps to craft a bun that stays put all day. Each step builds on the last for a flawless result.
Step 1: Prep Your Hair
Start with clean, dry hair. Wash and condition to remove buildup. This ensures a smooth base. Next, detangle with a brush. If your hair is frizzy, apply a small amount of smoothing serum. Comb through to distribute evenly.
For extra hold, lightly dampen your hair with water or a spray bottle. However, avoid soaking it, as wet hair can loosen the bun later.
Step 2: Create a High Ponytail
Brush your hair upward to the crown of your head. The higher the ponytail, the more classic the ballerina bun. Use a comb to smooth out bumps. Secure with a strong hair tie. Double-wrap it for extra hold.
Check the ponytail in a mirror. Ensure it’s centered and tight. A loose base leads to a wobbly bun.
Step 3: Smooth with Gel or Pomade
Apply a pea-sized amount of gel or pomade to the ponytail. This creates the sleek look. Use a comb to spread it evenly from root to tip. Focus on flyaways around the hairline. Be careful not to overuse product, as it can weigh hair down.
For curly or textured hair, work in small sections. This ensures every strand is smooth.
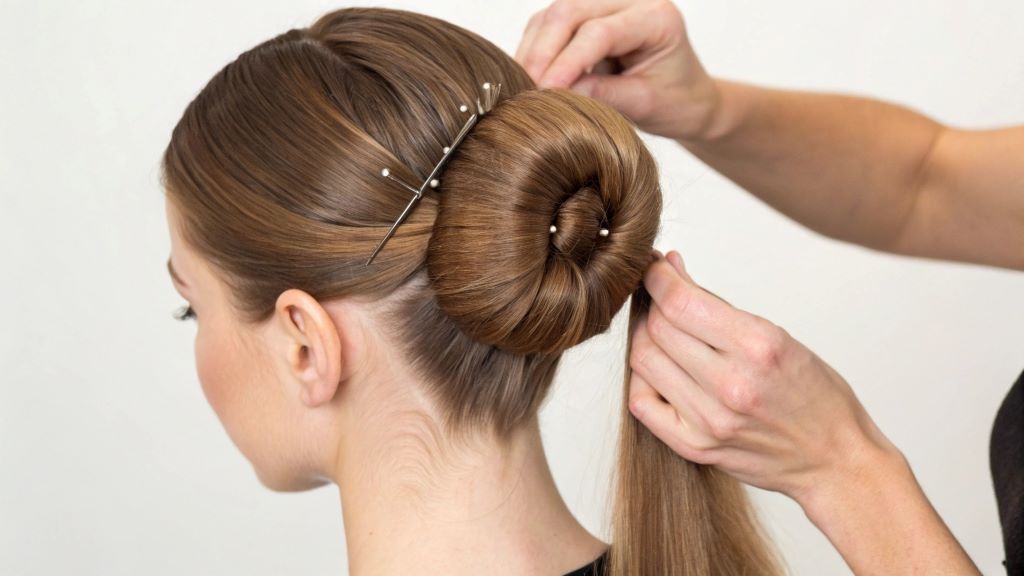
Step 4: Twist or Use a Bun Maker
You have two options here. First, twist the ponytail tightly into a coil. Wrap it around the base to form a bun. Alternatively, use a donut bun maker for a fuller shape. Slide the ponytail through the donut, then spread the hair over it. Secure with another hair tie.
Both methods work well. Choose based on your hair length and desired volume.
Step 5: Secure with Pins
Use bobby pins to pin the bun in place. Insert them at an angle, catching both the bun and scalp hair. For extra hold, add U-shaped pins. These grip thicker sections. Aim for at least six pins, evenly spaced.
Check for loose strands. Tuck them in with additional pins. The bun should feel firm but not painful.
Step 6: Set with Hairspray
Finish with a strong-hold hairspray. Spray lightly from 10 inches away to avoid a sticky feel. Focus on the bun and hairline. For a glossy finish, add a touch of shine serum. This enhances the polished look.
Let the hairspray dry for a minute. Then, check the bun’s shape in a mirror.
Tips for Different Hair Types
Not all hair is the same, and the ballerina bun adapts to various textures. Here’s how to tweak the process:
- Fine Hair: Add volumizing mousse before styling. Use a smaller donut for a fuller look.
- Thick Hair: Use extra pins and a stronger hair tie. Work in sections for control.
- Curly Hair: Straighten lightly with a blow-dryer for a smoother bun. Or embrace texture for a softer style.
- Short Hair: Use a mini donut or extensions. Pin carefully to cover gaps.
Experiment to find what works best. Practice makes perfect.
How to Make Your Bun Last All Day
A long-lasting bun requires a few extra steps. First, ensure your hair tie is tight but comfortable. A loose tie leads to slippage. Second, use enough pins. Skimping here causes the bun to unravel.
Weather can affect your bun. In humid conditions, apply an anti-humidity spray. For windy days, add an extra layer of hairspray. If you’re active, like dancing, reinforce with more pins.
Check your bun every few hours. Carry mini hairspray and pins for quick fixes. This keeps it neat.
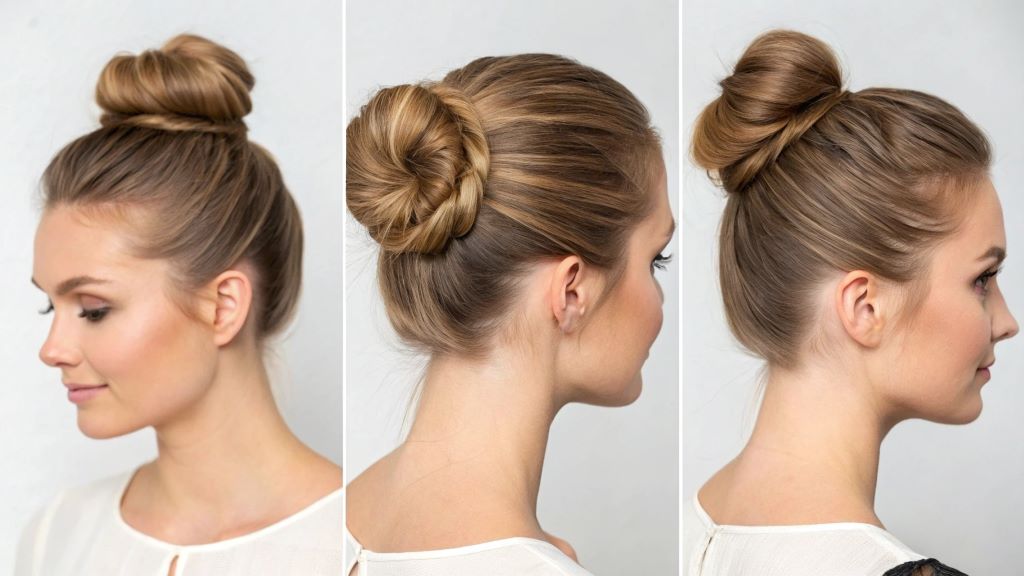
Styling Variations for a Modern Twist
The classic ballerina bun is versatile. You can add flair to suit your style. Try these variations:
- Braided Bun: Braid the ponytail before coiling it. This adds texture.
- Messy Bun: Loosen a few strands for a relaxed vibe.
- Embellished Bun: Add a sparkly clip or headband for events.
- Low Bun: Place the bun at the nape for a softer look.
These tweaks keep the style fresh. They also suit different occasions, from casual to formal.
Common Mistakes to Avoid
Even with practice, mistakes happen. Here are pitfalls to watch for:
- Using too much product, which makes hair greasy.
- Placing the ponytail too low, altering the classic look.
- Skipping pins, leading to a loose bun.
- Not smoothing flyaways, which ruins the sleek effect.
- Over-tightening, causing discomfort or breakage.
Take your time to avoid these. A little patience goes a long way.
Maintaining Healthy Hair for Styling
Healthy hair holds a bun better. Regular trims prevent split ends. Use a nourishing conditioner weekly. Avoid overusing heat tools, as they weaken hair. A balanced diet also helps. Foods rich in biotin, like eggs, support hair strength.
For more hair care tips, check out Vogue’s guide to healthy hair. Additionally, Allure offers expert advice on maintaining shine.
Conclusion
Creating a perfect ballerina bun is achievable with the right steps. Start with clean hair, use quality tools, and secure tightly. Adapt the process for your hair type and add variations for flair. Avoid common mistakes and maintain healthy hair for the best results. With practice, your sleek high ballerina bun will turn heads and stay flawless all day.
Frequently Asked Questions
- How long does it take to create a ballerina bun?
With practice, it takes about 5-10 minutes. Prep time varies by hair type. - Can I do a ballerina bun with short hair?
Yes, use a mini donut or extensions. Pin carefully to cover gaps. - What products keep a bun sleek all day?
Strong-hold hairspray and smoothing gel or pomade work best. - How do I prevent my bun from falling?
Use a tight hair tie and enough pins. Reinforce for active days. - Can I wear a ballerina bun for casual settings?
Absolutely. Loosen it slightly or add accessories for a relaxed look.
Read More: